See how we built and hung a 200 lb lobby sign for Slack without touching the wall.
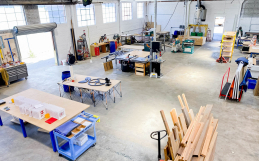
![Slack lobby sign drawing Slack lobby sign drawing](https://www.tinkeringmonkey.com/wp-content/uploads/2019/05/slats-mock-v2_1-1024x630.jpg)
Milling About
We needed a nice looking, lightweight material for this project (so shallow of us, amirite?). We opted for Western Red Cedar for weight and straight grain. Our local lumberjack hooked us up with some lovely boards and we got to cutting. The shop smelled amazing for a week straight.
![Slack sign - raw cedar blanks Slack sign - raw cedar blanks](https://www.tinkeringmonkey.com/wp-content/uploads/2019/05/slack_01-mill-3-1024x681.jpg)
![Slack sign - milling up wood Slack sign - milling up wood](https://www.tinkeringmonkey.com/wp-content/uploads/2019/05/slack_01-mill-2-1024x681.jpg)
![Slack lobby sign - milling up wood Slack lobby sign - milling up wood](https://www.tinkeringmonkey.com/wp-content/uploads/2019/05/slack_01-mill-1-1024x681.jpg)
![Slack lobby sign - cutting Slack lobby sign - cutting](https://www.tinkeringmonkey.com/wp-content/uploads/2019/05/slack_02-cut-1-1024x681.jpg)
![Slack lobby sign - cut cedar Slack lobby sign - cut cedar](https://www.tinkeringmonkey.com/wp-content/uploads/2019/05/slack_02-cut-6-400x400.jpg)
Sorting
We spent a lot of time flipping, rotating, and categorizing each bar to create a harmonious pattern.
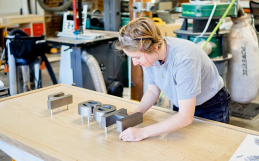
![Slack lobby sign - select Slack lobby sign - select](https://www.tinkeringmonkey.com/wp-content/uploads/2019/05/slack_02-cut-4-1024x681.jpg)
![Slack lobby sign - align Slack lobby sign - align](https://www.tinkeringmonkey.com/wp-content/uploads/2019/05/slack_02-cut-7-1024x768.jpg)
The Glue that Binds
Alignment was critical during the glue-up to make sure all the angled lines were perfectly straight. We used over 150 wood pins or “tennons” to make sure everything lined up.
![Slack lobby sign - glue up Slack lobby sign - glue up](https://www.tinkeringmonkey.com/wp-content/uploads/2019/05/slack_03-glueup-7-1024x681.jpg)
![Slack lobby sign - glue up Slack lobby sign - glue up](https://www.tinkeringmonkey.com/wp-content/uploads/2019/05/slack_03-glueup-3-1024x681.jpg)
![Slack lobby sign - glue up Slack lobby sign - glue up](https://www.tinkeringmonkey.com/wp-content/uploads/2019/05/slack_03-glueup-10-1024x681.jpg)
![Slack lobby sign - glue up Slack lobby sign - glue up](https://www.tinkeringmonkey.com/wp-content/uploads/2019/05/slack_03-glueup-12-1024x681.jpg)
Location, Location, Location
We used laser cut templates to accurately place the logo elements on each of the three panels. Since each panel was cut separately, accurate alignment was key to making sure the whole logo landed exactly right when fully assembled.
![Slack Lobby Sign - template Slack Lobby Sign - template](https://www.tinkeringmonkey.com/wp-content/uploads/2019/05/slack_04-template-4-1024x681.jpg)
![Slack Lobby Sign - template Slack Lobby Sign - template](https://www.tinkeringmonkey.com/wp-content/uploads/2019/05/slack_04-template-5-1024x681.jpg)
![Slack Lobby Sign - template Slack Lobby Sign - template](https://www.tinkeringmonkey.com/wp-content/uploads/2019/05/slack_04-template-1-1024x681.jpg)
CNC
Each part was carefully pocketed out on a CNC router and followed by a hand router to finish the cut.
![slack_05-cut-1 Slack Lobby Sign - cut](https://www.tinkeringmonkey.com/wp-content/uploads/2019/05/slack_05-cut-1-1024x681.jpg)
![Slack Lobby Sign - cut Slack Lobby Sign - cut](https://www.tinkeringmonkey.com/wp-content/uploads/2019/05/slack_05-cut-8-1024x768.jpg)
![Slack Lobby Sign - cut Slack Lobby Sign - cut](https://www.tinkeringmonkey.com/wp-content/uploads/2019/05/slack_05-cut-7-1024x768.jpg)
Finishing
A couple coats of clear finish brought out the color and added a protective layer.
![Slack sign - finishing Slack sign - finishing](https://www.tinkeringmonkey.com/wp-content/uploads/2019/05/slack_05-finished-4-1024x681.jpg)
![Slack sign - finishing Slack sign - finishing](https://www.tinkeringmonkey.com/wp-content/uploads/2019/05/slack_05-finished-5-1024x681.jpg)
![slack_05-finished-9](https://www.tinkeringmonkey.com/wp-content/uploads/2019/05/slack_05-finished-9.jpg)
![Slack sign - finishing Slack sign - finishing](https://www.tinkeringmonkey.com/wp-content/uploads/2019/05/slack_05-finished-3-1024x681.jpg)
![Slack sign - finishing Slack sign - finishing](https://www.tinkeringmonkey.com/wp-content/uploads/2019/05/slack_05-finished-2-1024x768.jpg)
Installation
This jumbo sign is now living in the lobby of the Slack building. We weren’t able to drill any holes in the wall, so a cable system was installed from the ceiling and supports the three panels. After hanging each panel, we snugged them up to each other with some steel plates on the back for a seamless look.
![Slack Lobby Sign - installation Slack Lobby Sign - installation](https://www.tinkeringmonkey.com/wp-content/uploads/2019/05/slack_06-install-1-1024x768.jpg)
![Slack Lobby Sign - installation Slack Lobby Sign - installation](https://www.tinkeringmonkey.com/wp-content/uploads/2019/05/slack_06-install-5-400x400.jpg)
![Slack lobby sign - installed Slack lobby sign - installed](https://www.tinkeringmonkey.com/wp-content/uploads/2019/05/slack_07-done-1-1024x768.jpg)